Last updated Saturday March 31, 2012
ATX Power Supply as a 12V DC-DC Converter
Electric cars have large battery packs that range from 72 volts to over 360 volts.
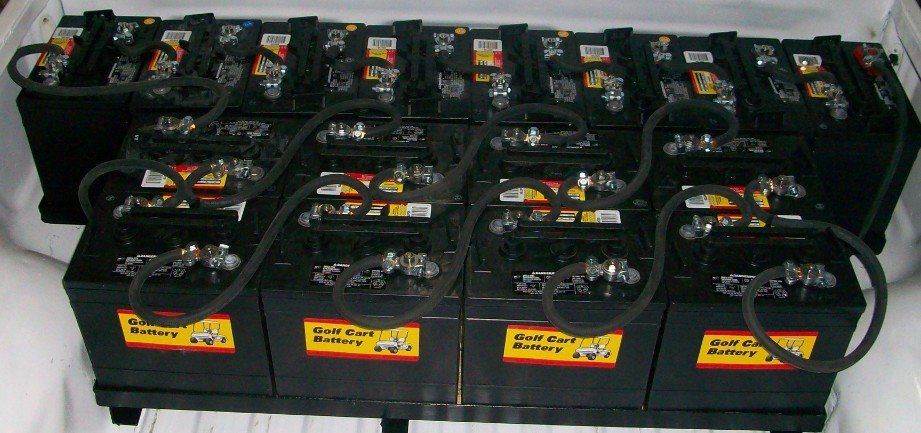
To power all the regular 12 volt car accessories, a DC to DC converter is necessary. This device converts the high voltage coming from the battery pack down to 12-14 volts. This low voltage then powers the headlights, turn signals, interior lights, and accessories.
While you are more than welcome to spend $700+ for a specialized DC-DC converter designed for electric cars, I opted to make one for essentially no cost at all.
An ATX PC power supply is one of the most ubiquitous, least expensive power supplies. It is compact, quiet, light weight, extremely energy efficient, costs almost nothing, and provides several fixed, regulated voltage outputs at super high amperage.

An ATX power supply is truly an engineering marvel. I experimented with a Dell PC power supply initially because I had a couple lying around.
I ended up throwing it out for the following reasons:
- It was too annoying to try and figure out the non-standard proprietary color coding of wires.
- It was 3 times heavier than a standard ATX supply.
- It had a 120/240V selector switch and extra transformer, making the DC section requiring too high of a voltage.
- It was only 300 watts. With all accessories on, (including high beams) it would shut down.
- It was an older supply and maybe at best only 65% efficient.
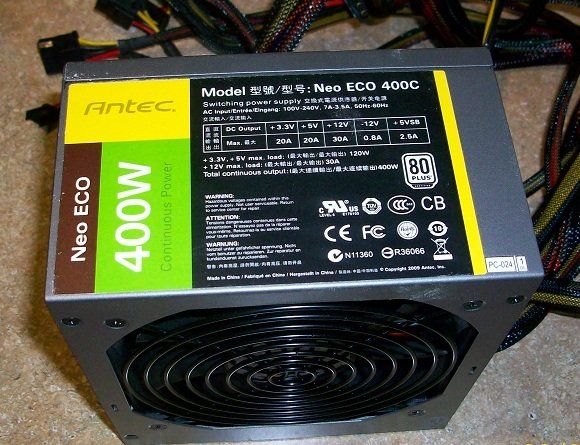
When shopping around for an ATX supply, I recommend buying one that meets the following requirements:
- 80+ Bronze or higher. It will run quieter, cooler and extend your EV range slightly.
- 400 Watt output or higher. 12V accessories draw a lot of power.
- Has a single 30Amp (or higher) 12V rail. Lights and accessories will run off of a single 12V source, just like in a regular car.
Update: Hold up, the following is way more complicated than it needs to be.
A few months after going through all this hassle, I discovered that you can just connect up the high-voltage DC directly up to the normal 120VAC plug on the ATX power supply. No modification of the ATX supply is necessary.
So save yourself some trouble and skip the remainder of this article.
Warning: Opening up an ATX supply will expose you to dangerous high voltages. Do so at your own risk.
Caution: Opening up an ATX supply will also void its warranty.
If you accidentally kill it, fear not, just buy another one for $35. Newegg usually has a shell shocker deal on a power supply at least once a week. With the money you save, you could potentially go through 20 of these things before you are out the same amount of money as the cost of 1 regular DC – DC converter.
I killed my bran new ATX supply when I accidentally shorted a 120VDC wire with another part of the switching supply circuit. I temporally cannibalized one of my PCs so I could finish the job and drive the truck the next day.
I bought 2 more ATX supplies so I can have a spare on hand. If the primary one goes out, I can quickly swap it out with the spare one.
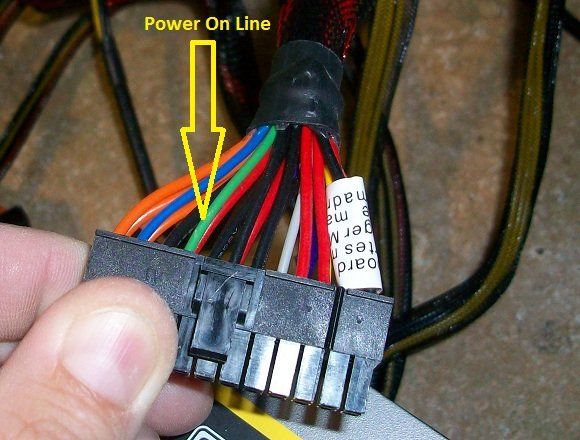
An ATX supply will not turn on unless the “power on” line (green wire) is shorted to ground. You can find a wiring diagram of an ATX supply on Wikipedia here.
For it to turn on, there should also be a small constant load on either the 5V or 12V line. I bent a small piece of wire and shoved it into sockets 15 and 16 of the 20/24 pin connector that normally connects onto a PC motherboard.
This will allow you to plug in the ATX power supply, turn it on and test it out without requiring a motherboard to be connected.

Step 1: Void the warranty. After you know the supply works, take it apart and remove the circuit board. Be as gentle as possible so you don't damage any of the components or break any wires. Keep all screws as you will need them when you re-assemble.

Step 2: Identify the bridge rectifier circuit. It will be a black, square package with 4 pins, (some supplies use 4 discrete diodes). There are typically 1 or more large capacitors on its output for filtering. While powering the ATX supply off of 120VAC, with a volt meter, you should be able to probe and measure 154VDC at the + and - DC output of the rectifier.
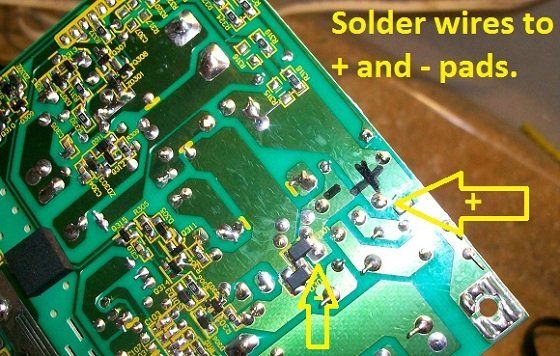
The first stage of a switching supply (after line filtering and surge suppression) is rectification. This stage converts line level AC voltage into high voltage DC. Since an EV battery is already DC, we need to bypass the line filtering and rectification stages.
Step 3:
Solder a couple 12-14 gauge stranded wires to this high voltage DC output. Add fuse protection that is easily accessible.
Step 4:
Drill a new hole in the original case and thread the 12-14 gauge DC wires through it. Use a grommet so the wires don't accidentally get cut on a sharp edge and short to ground.
Step 5: Reassemble the power supply back in its case. The ATX power supply will now power directly off of high-voltage DC. I left the AC outlet and line filter in place even though it serves no purpose now. In a pinch, I could rip this thing out of my truck, and throw it back into a PC.
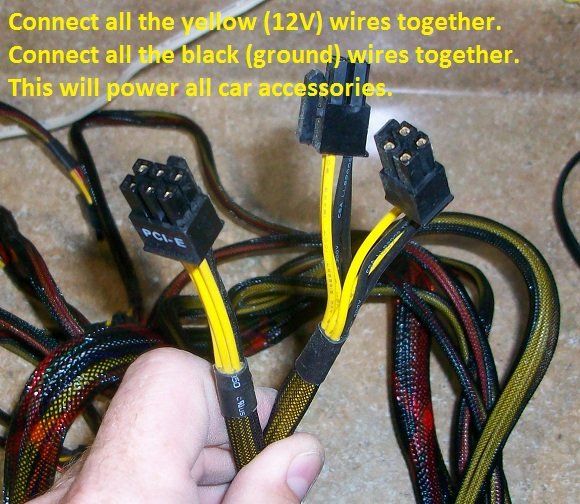
Step 6:
Connect all the yellow (12V wires together. Connect all the black (ground wires together). Using the old alternator wiring and 12V battery wiring, connect the ATX supply into the original automotive fuse box.

Step 7:
Install the modified ATX power supply into your EV, near the battery pack and away from any places where it could get wet.
I prefer to wire the ATX supply so it is always on. That way all the vehicle accessories will have power available even when the key is not in the ignition position. The vehicle accessory loads suffice for the load requirement an ATX supply requires in order to turn on initially.
The more efficient the ATX supply is, the less energy it will drain from your battery pack. An 80+ supply will give the EV slightly more range than a less efficient supply.
Last year, I gave my EV truck a very through washing. I then learned that water had gotten into the supply, shutting it down. After drying it out for a few hours, the ATX supply came back to life.

I added a proprietary ice-cream bucket cover to protect the ATX supply to prevent it from any future water intrusion.
To date, (3/2012) I have used this same ATX supply for almost 7 months and 6000+ miles.
Disadvantages:
- Slightly dimmer headlights. A regular alternator in a gas car puts out 14 volts DC. An ATX supply only puts out 12 volts. I installed brighter headlights to make up the difference. Ultimately, I want to get LED head lights.
- An ATX supply will not work with battery packs with too low or too high of voltage. Anything less than 96 volts DC and more than 280 volts DC could make the ATX supply not operate correctly. A very low battery could shut down the ATX supply (although amazingly, the ATX supply on my EV truck still works even when being fed by only 36VDC).
- High current surges could trip the supply. This has never happened to me but it is a concern of mine. If you have a vacuum pump to assist braking, make sure its current rating doesn't exceed the rating of the supply. I swapped out all lighting (except for head lights and blinkers) with LEDs to lessen the current draw.
- With all accessories on, (highbeams, LED brake lights, hazards, radio, cab fan on high, horn blaring, and contactor engaged), my EV truck draws almost 35 Amps from the ATX supply.
Here is a breakdown of the power and current draws of typical vehicle accessories remaining in an EV.
Vehicle Accessory
Running Lights (LED)
Headlights
Highbeams
Hazzards (intermittent)
Contactor
Radio (turned on)
Wipers
Fan - High
Fan - Med-High
Fan - Medium
Fan - Low
Brake Lights (LED)
Reverse Lights (LED)
Horn
Max Amp Draw
12VDC Amps
0.82
5.10
7.23
7.40
1.91
0.18
4.50
9.00
5.50
3.40
2.27
0.12
0.12
2.64
34.92
Watts
9.84
61.20
86.76
88.80
22.92
2.16
54.00
108.0
66.0
40.8
27.24
1.44
1.44
31.68
407.04
It takes a lot of power to run car accessories. From the chart above, it is evident that in a very unusual situation, I am exceeding the spec of my ATX supply.
In practice, my truck typically draws 9-11 amps from the ATX supply when driving at night and only 3-5 amps in the daytime.
I opted to change out some of the bulbs with LEDs. A basic incandescent indicator bulb draws 2 amps at 12 volts. A similar brightness LED will draw 10 times less power.
